
Trying out Let's Encrypt (beta)
04 November 2015What’s great about Let’s Encrypt?
Let’s Encrypt is a new certificate authority, recognized by all major browsers. They make it a breeze to set up TLS certificates for your web server. And for free! With a service like this, anyone can set up TLS for his or her services easily.
Let’s Encrypt is way better option because certificate authorities normally:
- Cost money
- Deliver certificates manually and require manual installation
- Require the user to keep track of renewing certificates
- Don’t document well
- Don’t have modern cryptographic backed methods for verifying proper ownership of domains (haha)
How it works
I just set up this domain (conorpp.com) to use Let’s Encrypt. As you can see from inspecting this domain’s certificate information, it has been verified by Let’s Encrypt Authority X1.
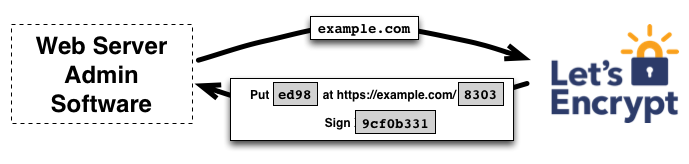
Let’s say we want to get a certificate for example.com. For Let’s Encrypt to issue us a certificate, we must prove to them that we control the server. If we own the domain, we can do this with a series of challenge-response transactions, which is part of the ACME protocol. Let’s Encrypt explains this process well.
Using ACME, we have an automated method for securely generating certificates and revoking them.
Once you have a domain white listed by Let’s Encrypt, you can get started.
Just log into your server and run the Let’s Encrypt client.
git clone https://github.com/letsencrypt/letsencrypt
cd letsencrypt
# make sure to stop any server running on port 80
./letsencrypt-auto --agree-dev-preview --server \
      https://acme-v01.api.letsencrypt.org/directory auth
# It will prompt you for domains to validate then proceed with ACME
And that’s it (mostly)! We specify the web server admin to be used in our ACME transactions (https://acme-v01.api.letsencrypt.org/directory), and “auth” specifies the client to obtain a cert, but not to install it. As Let’s Encrypt continues to develop, they plan to automate the cert installation for web servers like Apache and Nginx.
But for now, I had to take an extra step and specify my new cert in my Nginx config:
http{
  server{
    …
    listen              443 ssl;
    server_name         conorpp.com;
    ssl_certificate     /etc/letsencrypt/live/conorpp.com/fullchain.pem;
    ssl_certificate_key /etc/letsencrypt/live/conorpp.com/privkey.pem;
    …
  }
}
We specify our private key, privkey.pem, and the fullchain.pem, which contains the concatenation of the server certificate, Let’s Encrypt Authority certificate, and Let’s Encrypt’s signature from IdenTrust.
sudo nginx -s reload
That’s it! Be sure to check your configurations with SSL Labs. When it comes time to renew a certification, all you need to do it run this again:
./letsencrypt-auto --agree-dev-preview --server \
      https://acme-v01.api.letsencrypt.org/directory auth
Let’s Encrypt issues certificates with a shelf life of 90 days.
Note that at the time of this post, Let’s Encrypt is in beta. After some time, the Let’s Encrypt client should be used following these simple instructions.